Knowledge Center
Getting started (quick overview)
The plugin is built around two core areas:
Inventory
- You define properties to describe objects (e.g., Model, Version, Installed OS, condition).
-
You define objects types (items you want to manage and lend/assign).
-
You create objects.
Bookings
-
Authorized users can reserve objects.
-
Users can edit or delete their own bookings.
-
The administrator can manage bookings for other authorized users.
Access to bookings is restricted through a dedicated ad-hoc system role.
Installation
Install it like any local Moodle plugin:
-
Copy it into the correct Moodle local plugin directory.
-
Visit Site administration → Notifications to complete the installation.
-
Confirm the installation and check the plugin settings in the configuration area
(/admin/settings.php?section=local_inventario).
Tip: always test the plugin on a staging Moodle environment before deploying it to production ( like always  ).
).
Quick access to Inventory & Bookings
A BLOCK-type plugin will be available in the future  , actually very soon.
It will allow you to add a dedicated block to the dashboard or right navigation for direct access to inventory and bookings.
Since this block is not yet available, we recommend using a temporary solution.
Temporary solution (recommended)
Add a Text block with a direct link to the plugin Invetory & Booking.
Steps:
- Go to
/my/indexsys.php -
Enable editing
-
Add a block to the navigation
-
Choose the Text block
-
Insert the following link:
-
Save the block
-
Click “Reset Dashboard for all users”
This action ensures the link is visible to all users on their dashboard.
Important note
⚠️ Attention:
If your users actively customize their dashboards, this method should not be used.
In that case, we strongly recommend adding the link to the Moodle homepage instead, so it remains visible to everyone.

First-time setup
Follow these steps in order to configure the plugin correctly.
System role (automatic)
During installation, the plugin automatically creates a dedicated system-level role named “Inventory & Booking”.
⚠️You only need to assign this role to the users who are allowed to book objects.
Only users with this role will have access to the booking system.
Create your properties (recommended approach)
Properties are used to describe objects in a structured way.
In the Free version, you can define up to 5 properties (unlimited in PRO).
Best practice:
Create a property group and assign all related properties to that group.
You can then assign the entire group to an object type. When a group is assigned, all properties belonging to that group are automatically applied.
We recommend (not mandatory) using the same name for the group as the object type. This keeps the inventory clean and consistent.
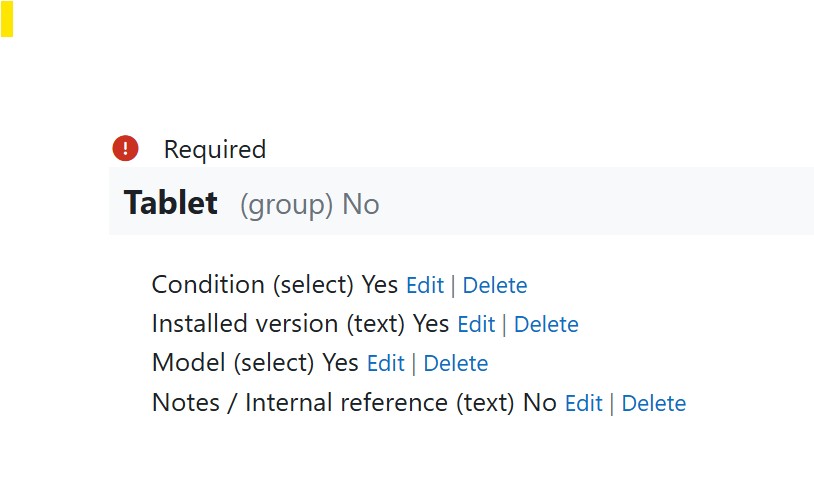
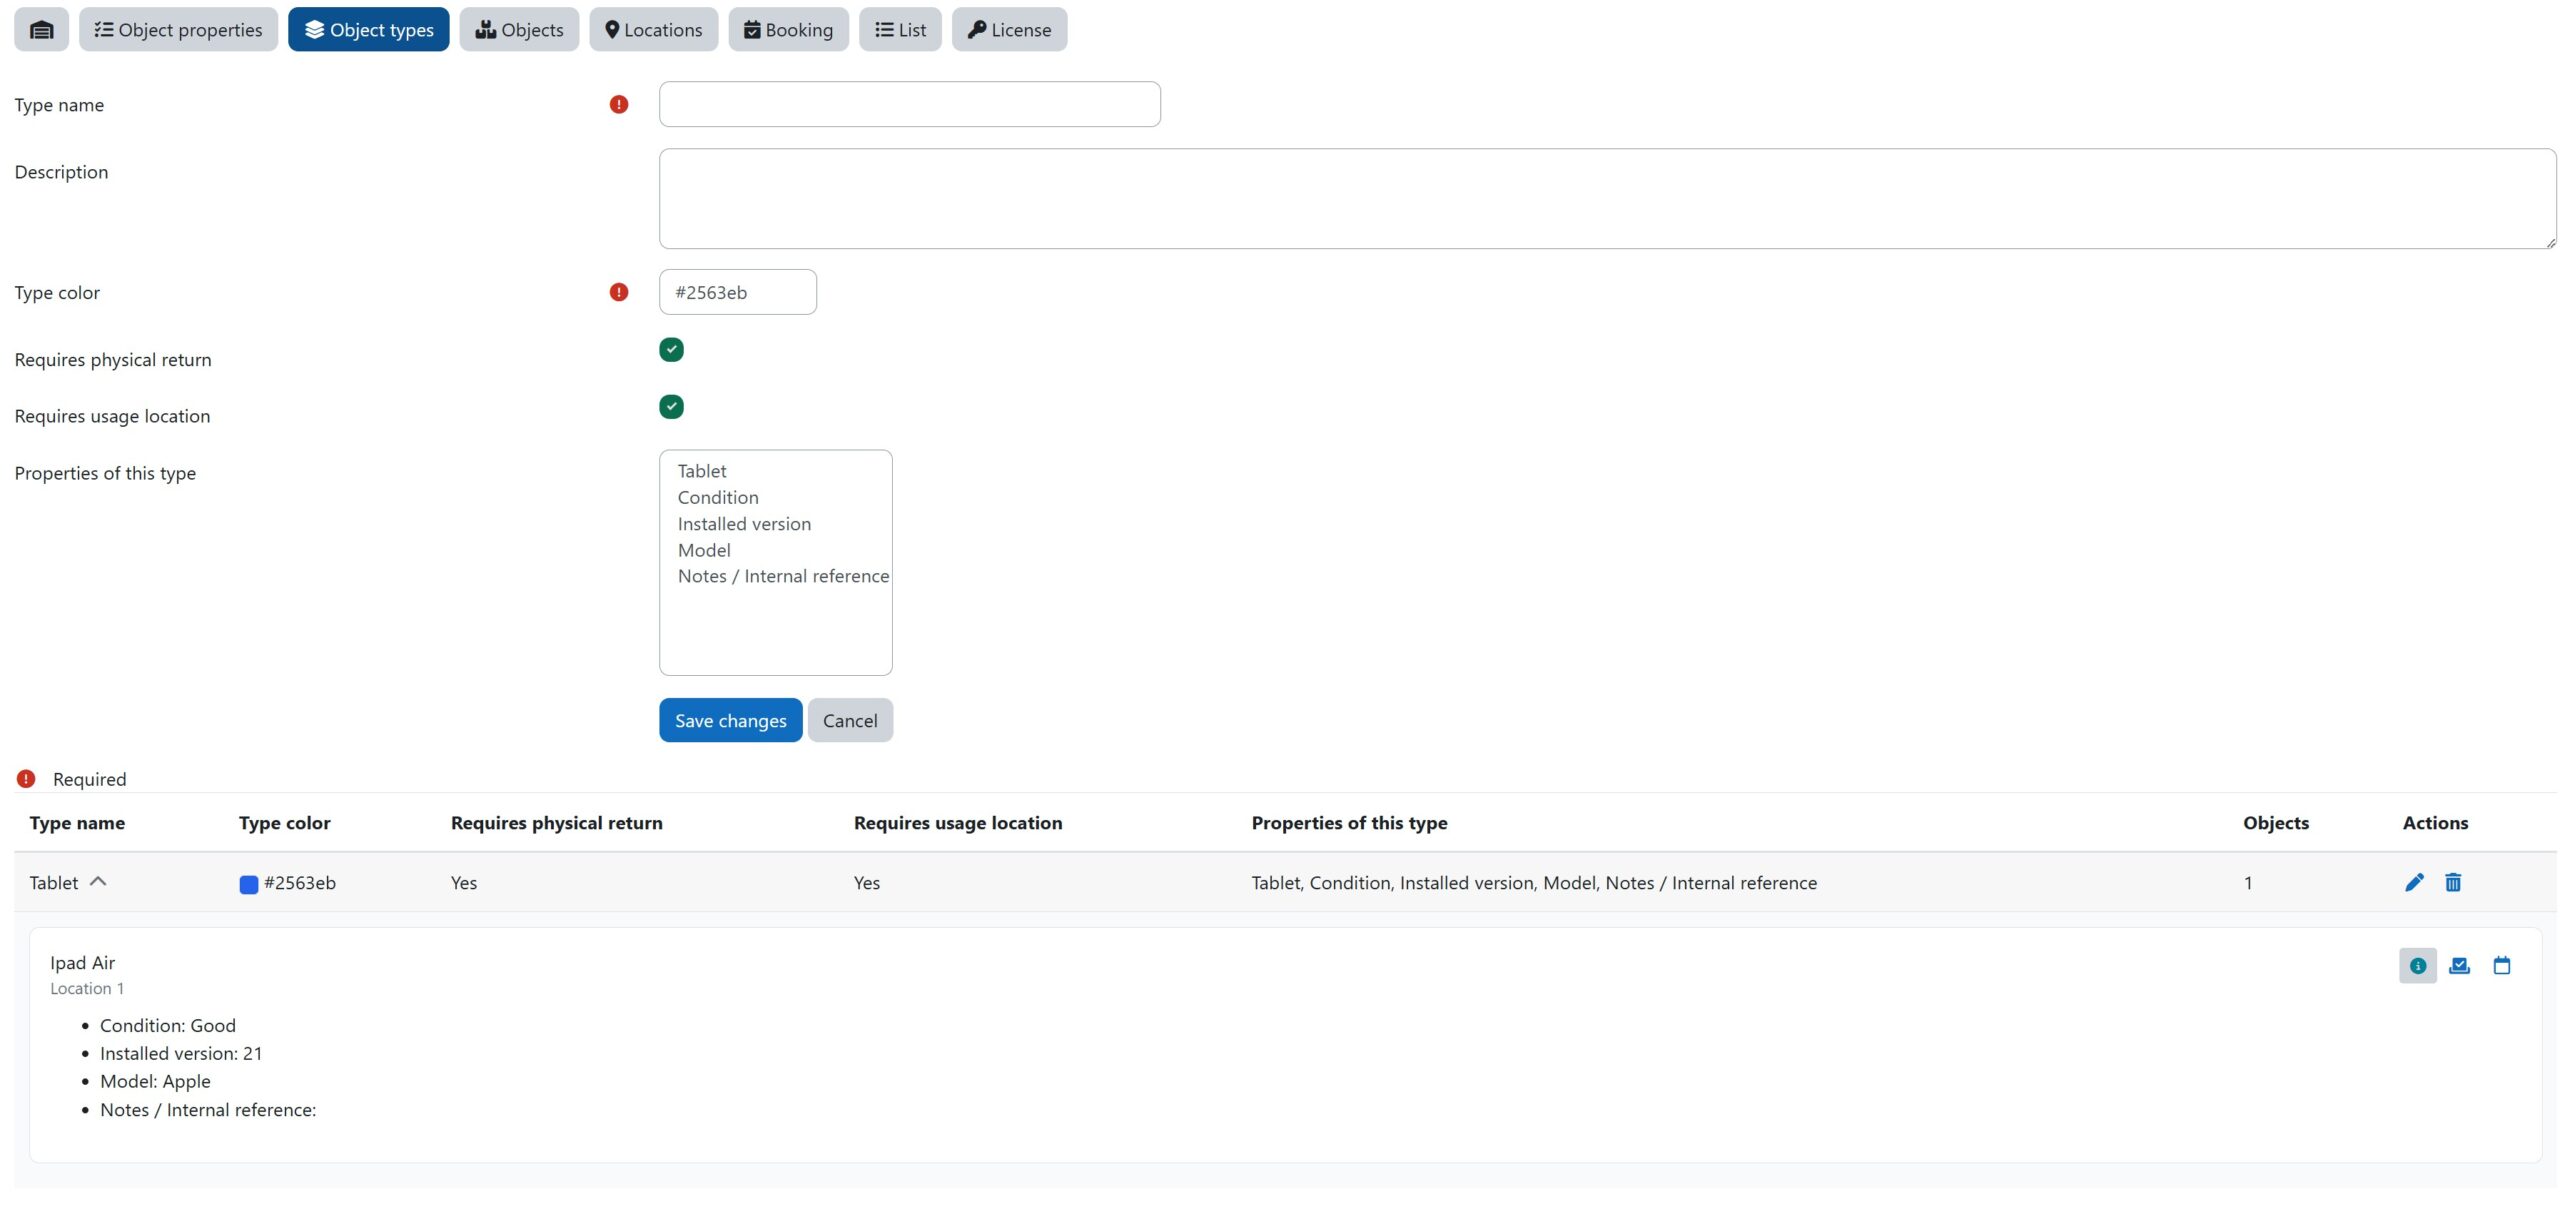
Example: Tablet properties
Create a property group called Tablet, then add properties such as:
-
Model
-
Version
-
Installed software
-
Condition
-
Notes / Internal reference
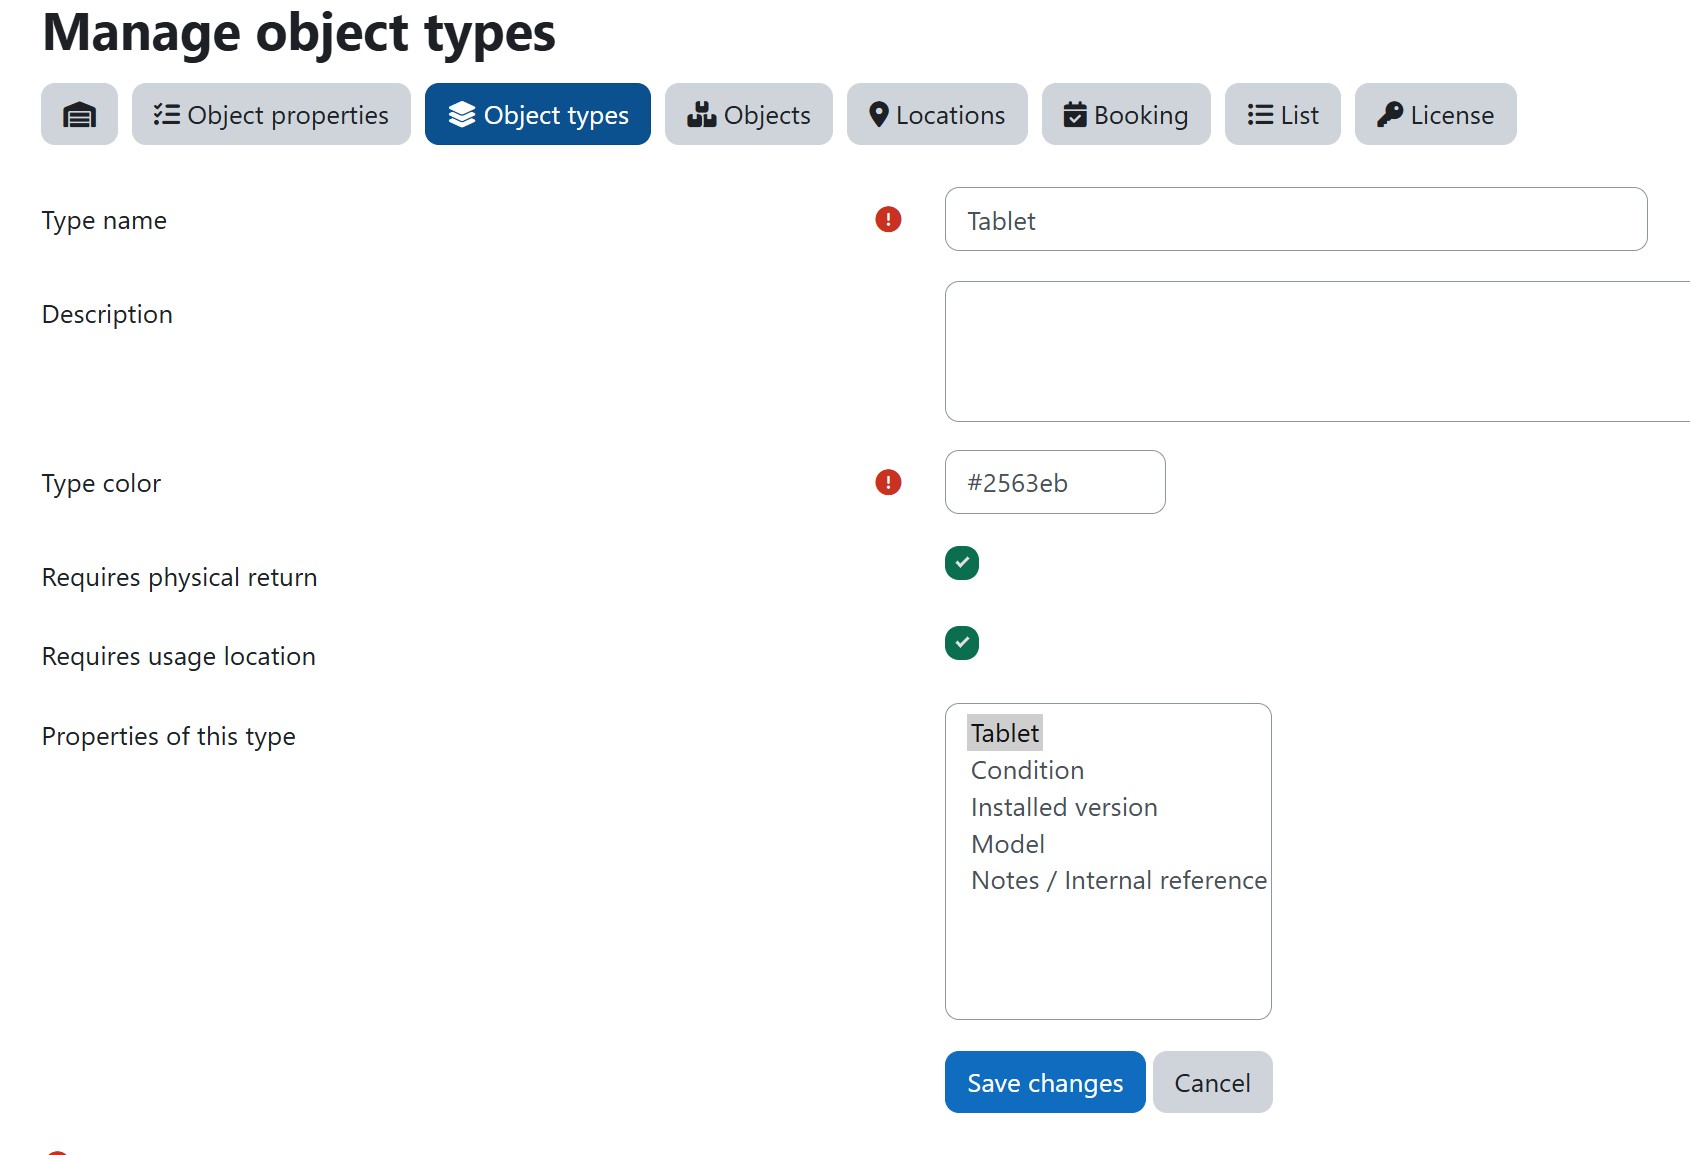
Create object types
After creating the properties and the property group, create the object type.
Steps:
-
Create a new object type
-
Use the same name as the previously created property group (e.g. Tablet)
-
Assign the property group to the object type
This step defines the structure that will be used by all objects of that type.
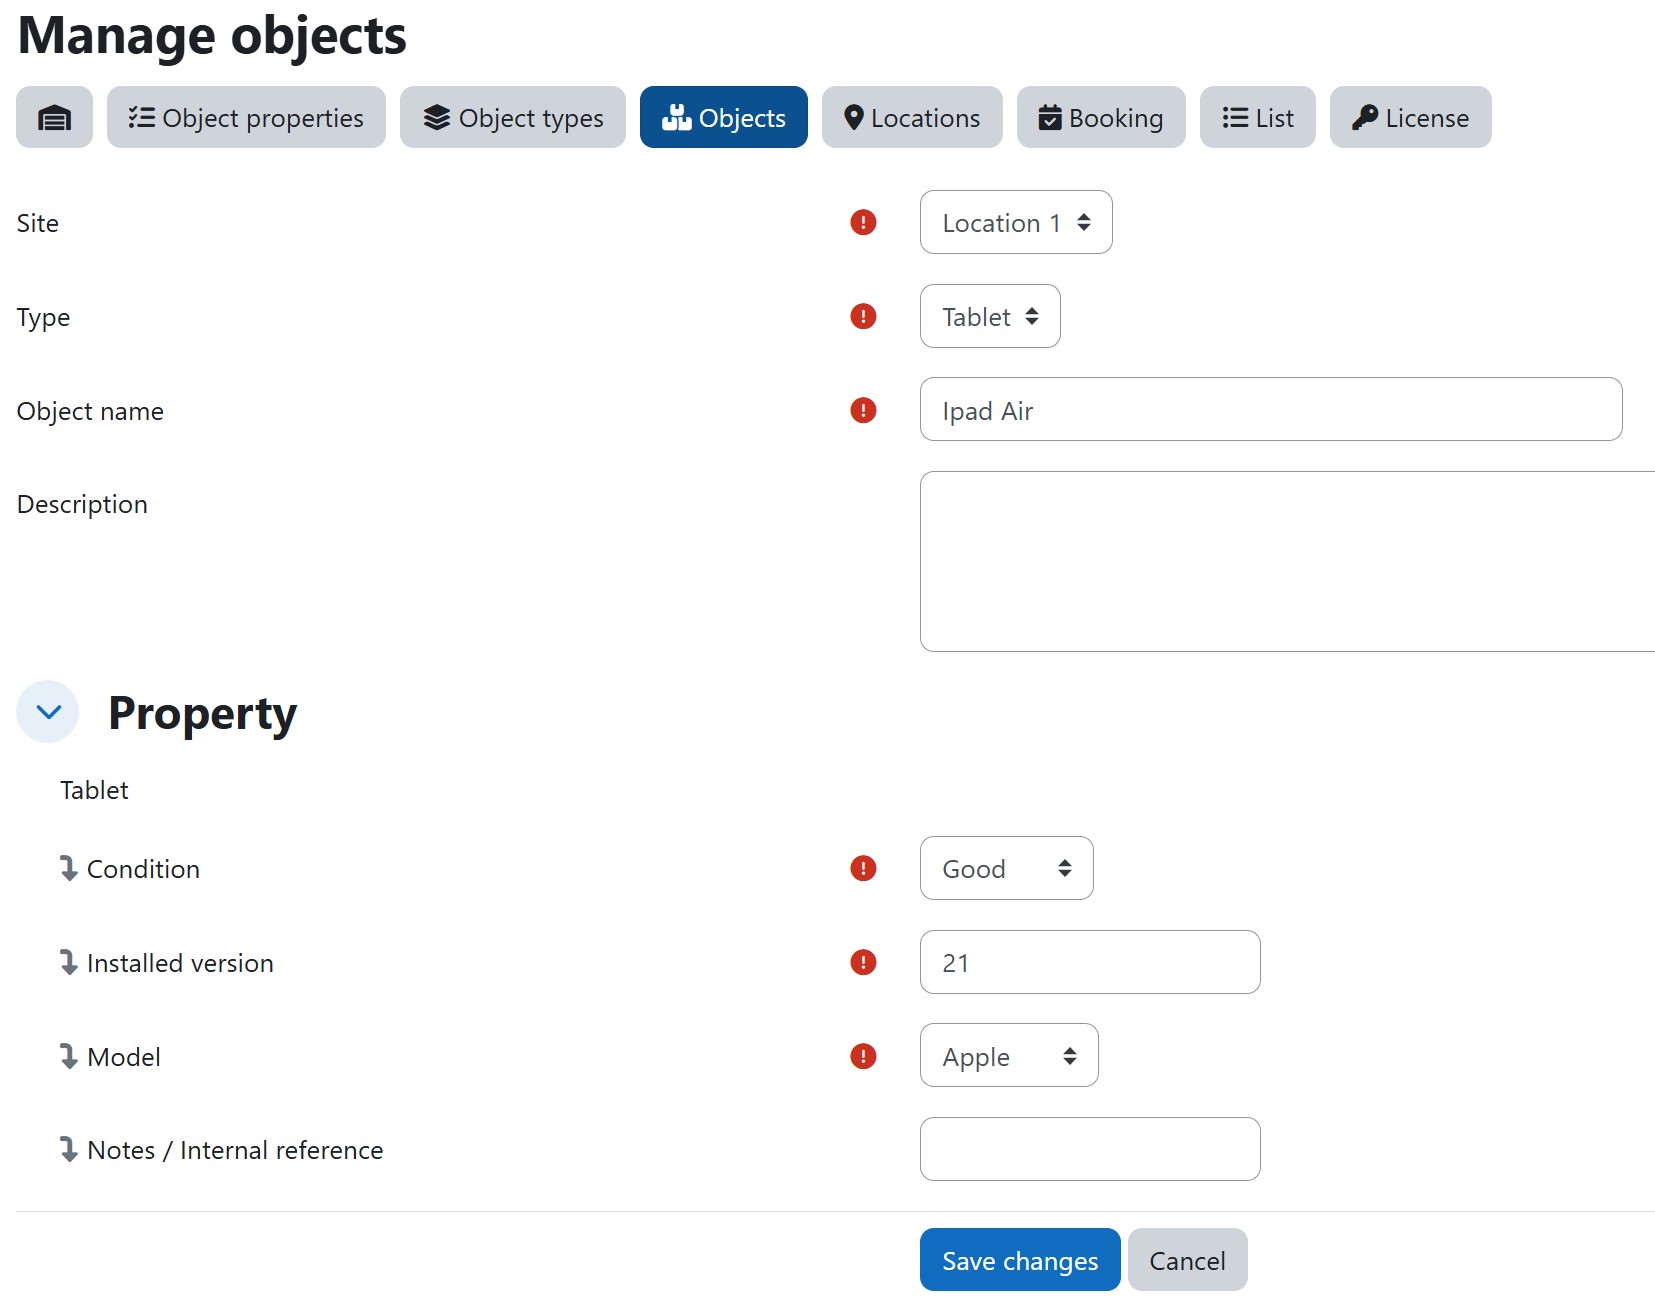
Create your first objects
You can now create one or more objects based on the object type.
Add your objects and fill in the automatically assigned properties.
Keep object names clear and consistent.
Test the booking flow
- Log in with a user who has the Inventory & Booking role assigned.
-
Verify that the user can:
-
View available objects
-
Create a booking
-
At this point, the system is ready for daily use.
Object properties
Object type
Object
Object Owerview
Roles & permissions (who can do what)
Administrator & Manager
-
Can manage the inventory (properties, object types, objects).
-
Can manage bookings for themselves.
-
Can manage bookings on behalf of other authorized users.
Authorized booker (user with the dedicated system role)
-
Can create bookings for themselves.
-
Can edit or delete their own bookings.
-
Cannot manage bookings for other users.
Regular users (no dedicated role)
-
Do not have access to the booking system.
This approach keeps the system clean: only users explicitly allowed can book objects.
Inventory
Objects
Objects represent the items you want to manage and make reservable.
Typical examples:
-
Laptops, tablets, projectors
-
Cameras, microphones, recording kits
-
Lab equipment, teaching kits
-
Company equipment (shared devices)
Good practice:
-
Use a naming convention (brand + model + identifier).
-
Keep properties consistent so filtering and searching stays useful.
Properties
Properties describe objects in a structured way.
Free version limit:
-
Up to 5 properties
-
Up to 15 objects
PRO version:
-
Removes limits and unlocks more advanced management features (including additional views (like calendar view) and filters).
Bookings
Create a booking
An authorized user:
-
Opens the booking area.
-
Selects an object.
-
Chooses the booking details (depending on item available fields).
-
Saves the booking.
Edit a booking
Authorized users can modify their own bookings:
-
Change booking details (as allowed by the system)
-
Save changes
Delete a booking
Authorized users can delete their own bookings only before or during the reservation period.
Past bookings cannot be deleted, as they become part of the object’s booking history.
Admin & Manager actions (book on behalf of others)
The administrator & Managers can:
-
Create a booking for another authorized user
-
Modify or delete bookings created by authorized users (when required)
This is useful for:
-
Centralized booking management
-
Handling exceptions
-
Fixing mistakes quickly
Free vs PRO
Free version
-
Fully usable with limitations:
-
Max 15 objects
-
Max 5 properties
-
-
Best for testing, small inventories, and for users who want to manage a limited number of objects at no cost.
PRO version
-
Removes limits and unlocks additional features (including more advanced views and filtering).
-
Includes PRO email support.
- You can find more information about the PRO version here: https://mdlbox.com/plugin_details/
PRO license activation (API key)
How it works:
-
Purchase the PRO license.
-
After payment, the API key is sent automatically by email.
-
Insert the API key in the plugin license field (/local/inventario/license.php).
-
The plugin verifies the license and activates PRO features.
Data handling:
-
Only the minimum technical data needed for license verification is transmitted (e.g., license validation and Moodle version).
-
No user data is transmitted to third parties.
Payments:
-
Payments are handled via Stripe, a globally recognized and trusted leader in online payment processing.
7-day trial
Not sure yet?
-
Contact us and we can provide a 7-day trial license.
-
You can test all PRO features, without limits.
-
After the trial, you decide whether to buy PRO or stay on Free.
Note:
We offer a 7-day trial because license purchases are non-refundable.
At the moment, no refund system has been implemented. We may develop a refund process in the future, and if so, our policy will be updated accordingly.
Support
Free support
-
Basic support via GitHub (issues / discussions).
PRO support
-
Email support for PRO users.
Tip: when requesting support, include:
- Moodle Domain (YOUR_DOMAIN.com)
-
Moodle version
-
Plugin version
-
Steps to reproduce
-
Screenshots (if relevant)
-
Any error messages
Troubleshooting
“I can’t see the booking area”
Most common cause: the user does not have the dedicated system role assigned.
Fix:
-
Assign the correct system role to the user.
-
Log out / log in again.
“I reached a limit when creating objects/properties”
You’re hitting the Free version limits:
-
15 objects
-
5 properties
Fix:
-
Remove unused items/properties, or upgrade to PRO.
“PRO features are not unlocked”
Common causes:
-
API key not inserted correctly
-
License not active
-
Connectivity issue during validation
Fix:
-
Re-check the API key
-
Confirm the license email details
-
Try again and verify your server can reach the license endpoint
None of these troubleshooting solutions solve your issue?
Then please contact us.